Mostrando entradas con la etiqueta spread/ vegetariano/vegetarian. Mostrar todas las entradas

lunes, 26 de diciembre de 2016

Banana coconut pancakes. Pancakes de banana y coco


Esta receta la hice por primera vez hace un tiempito pero no tuve tiempo de postearla hasta ahora. No tenia casi nada en casa y decidi improvisar con lo que tenia. Es super facil, se necesitan solo 3 ingredientes, se hace en un ratito y es mhmhmhmhm delicioso. Ojala les guste!

Ingredientes
- 1 banana muy madura
- 1 huevo
- 50 gr de coco rallado (1/2 taza aprox.)

Instrucciones
Pisar la banana haciendo un pure lo mas homogéneo posible. Agregar el huevo y mezclar bien, sumar el coco y volver a mezclar hasta que este todo bien unido. Calentar una sartén de hierro o antiadherente, si son paleo estricto poner un poquito de aceite de coco, si no pueden usar rocio vegetal o un poquito de aceite neutro o manteca. Poner porciones de una cucharada generosa aplastando levemente para que queden parejos. Esperar a que la base este bien dorada para darlos vuelta, del segundo lado va a necesitar menos tiempo. Y listo! acompañar con fruta fresca o lo que mas les guste. Con esta cantidad salen 6 pancakes, una linda cantidad para desayunar de a 2.


I prepared these pancakes some time ago, as I had almost nothing at home and improvised this. IThis year has been so hectic I hadn't have time until now to post it. It is super easy, you need only 3 ingredients and it is super delicious.

Ingredients
- 1 banana very ripe
- 1egg
- 50 gr shredded coconut (1/2 cup approx.)

Instructiones
Mash the banana until you get a nice even puree. Add the egg and mix it thouroughly, the add the coconut and mix it again. Heat a skillet or non-stick pan and grease it with your choice, coconut oil or if you are not strict paleo some neutral oil. Put a generous tablespoon of the mix on the heated skillet, evening the top. Wait until they are really golden in the base to turn them. The second side needs less time. That's all! This amount usually serves 6 pancakes, making it a nice breakfast for 2.





miércoles, 16 de noviembre de 2016

Lemon Sorghum Cookies. Galletitas de sorgo y limon


Hace un tiempo compré harina de sorgo por curiosidad. El Sorgo un cereal originario de Africa que  historicamente se usado para alimentar animales pero en los ultimos tiempos se popularizo entre los humanos ya que tiene un gran valor nutricional. Estuve un tiempo pensando que hacer y finalmente me animé. Como no le tenía mucha la onda decidi hacer como primer prueba unas galletitas que son medio infalibles. Esta vez no llegue a probar la versión vegana asi que sale la solo gluten free y en algún momento cuando pueda probaré la vegan. Recomiendo hacerlas bien chiquitas para que se quiebren menos y es una medida genial para comer con el cafe. Yo usé una tapita de una botella de 3 cm de diametro. Si tienen ganas les pueden hacer carita, con esta receta la galletita conserva su forma!!

Ingredientes
- 250 gr de harina de sorgo
- 100 gr de azucar
- 150 gr de manteca blanda
- 1 huevo
- 1 cdta de polvo para hornear
- ralladura de cascara de limon 

Instrucciones
Mezclar el polvo de hornear con la harina y luego todos los otros ingredientes hasta tener una masa homogenea. Envolver en film y dejar reposar media o una hora en la heladera. Precalentar horno a 180º. Retirar y estirar con palote hasta un espesor de medio cm, yo cubro la masa con un film para trabajar mas facil. Cortar las galletitas  Hornear por 18'-20' sin distraerse hasta que esten suavemente doradas. Buen provecho!!

Some while ago I bought Sorghum flour out of curiosity. Sorghum is a cereal originally from Africa, but nowadays is grown almost all aorund the globe. Historically was used to feed animals but lately due to it's high nutritional levels. I was thinking for some time what could I do with it and finally I dared. As I was not sure how it would behave I decided to do these cookies as a frist try as they are kind of unbeatable. I couldn't make it vegan, so it comes as Gluten free only, but I promise to try a vegan version soon. I recommend to cut the small, I used the a bottle cap, with a 3 cm diameter. They keep the shape so you can draw a smily face on them!!

Ingredients
- 250 gr sorghum flour
- 100 gr sugar
- 150 gr soft butter
- 1 egg
- 1 tsp baking powder
- zest of one lemon

Instructions
Mix the baking powder with the flower and then all the other ingredients until you get an even dough. cover with film and let it rest in the fridge for about half or one hour. Preheat the oven into 180º. Take the dough out of the fridge and roll it with a rolling pin. I cover it with a film to make it easier. Cut the cookies and bake them for about 18'/20' without going to far away until they are golden. Bon apetit!
 

lunes, 27 de junio de 2016

Galletitas de sesamo. Sesame crackers

Antes de viajar trato de prepararme algun power snack en caso de que la aerolinea se olvide mi dieta especial. En este caso tenia un monton de sesamo que habia comprado al por mayor y no llegue a consumir y decidi usarlo. Hice estas crackers que se hacen muy rapido y son una gran fuente de energia y felicidad. Se dejan comer solas o combinan maravillosamente con palta, dulce casero, queso blanco o lo que mas les guste.

Ingredientes
- 2 tazas de sesamo integral crudo (yo lo tenia en la heladera si lo hacen en verano recomiendo hacerlo)
- 1 cda de chia molida
- 2 cdas de aceite de coco derretido
- 1 pocillo de cafe de agua (a modificar segun necesario)
- 1 pizca de sal

Instrucciones 
Precalentar el horno a 170ºC.  Poner sesamo en la procesadora y pulsar hasta que se haga una arena mas o menos fina. Volcar en un bol, agregar la chia y y la sal y mezclar bien, es importante mezclar despues de la chia para que no se hagan grumos. Agregar el aceite de coco y la mitad del agua y mezclar energicamente tratando de formar una masa quebradiza pero homogenea, ir sumando mas agua hasta lograr que al aplastar la masa se vea lisa (con las irregularidades del sesamo claro). Si tienen una procesadora con un vaso grande pueden ir poniendo los ingredientes directo ahi y sacar una porcion con una cucharita para probar que este bien unida. Forrar una placa con papel de hornear o una plancha de silicona. Poner una porcion de masa y cubrir con film o papel para estirar hasta que quede de 4 mm de espesor masomenos. Marcar cuadrados o la forma que mas les guste y poner en el horno por 12' sin alejarse mucho que se queman rapido. Dejar enfriar del todo antes de comer para que esten crocantes y a disfrutar!!!

Before traveling I try to prepare myself some power snack just in case the airline forgets my special meal. This time I had an interesting amount of sesame and decided use them for this purpose. I baked these crackers, with very few ingredients and time required and they are a great source of energy and happiness too! You can enjoy them alone or with avocado, jam or cream cheese. 

Ingredients:
- 2 cups raw whole grain sesame (I had them in the fridge it you live in a hot weather aere  I recommend to do so)
- 1 Tbsp milled chia seeds
- 2 Tbsp melted coconut oil
- 1 espresso cup water (adjust as needed)
- 1 pinch salt 
Instructions 
Preheat oven to 170ºC. Put the sesame in the food processor and pulse until it becomes like wet sand. If you have enough space you can add the ingredients in the recipient, as mine is small I laid the sesame sand in a bowl. The order of the adding of the ingredients is important. First put the chia and salt and mix thoroughly, the add the oil and mix again, and last add the water first half of the cup, mix and keep adding checking the texture. The dough has to be a bit crumbly but able to look somehow smooth by pressing it. Lay parchment on a baking tin, put some of the dough and cover with more parchment or a film and roll it until it is around 4mm thick. take the film or top parchment out and mark with a pizza cutter or a knife squares or the shape you would like. Bake for around 12 minutes  or until slightly golden without going too far as they are very easy to burn. Let cool completely before eating to allow them to be really crunchy. Hope you enjoy them!!

sábado, 30 de abril de 2016

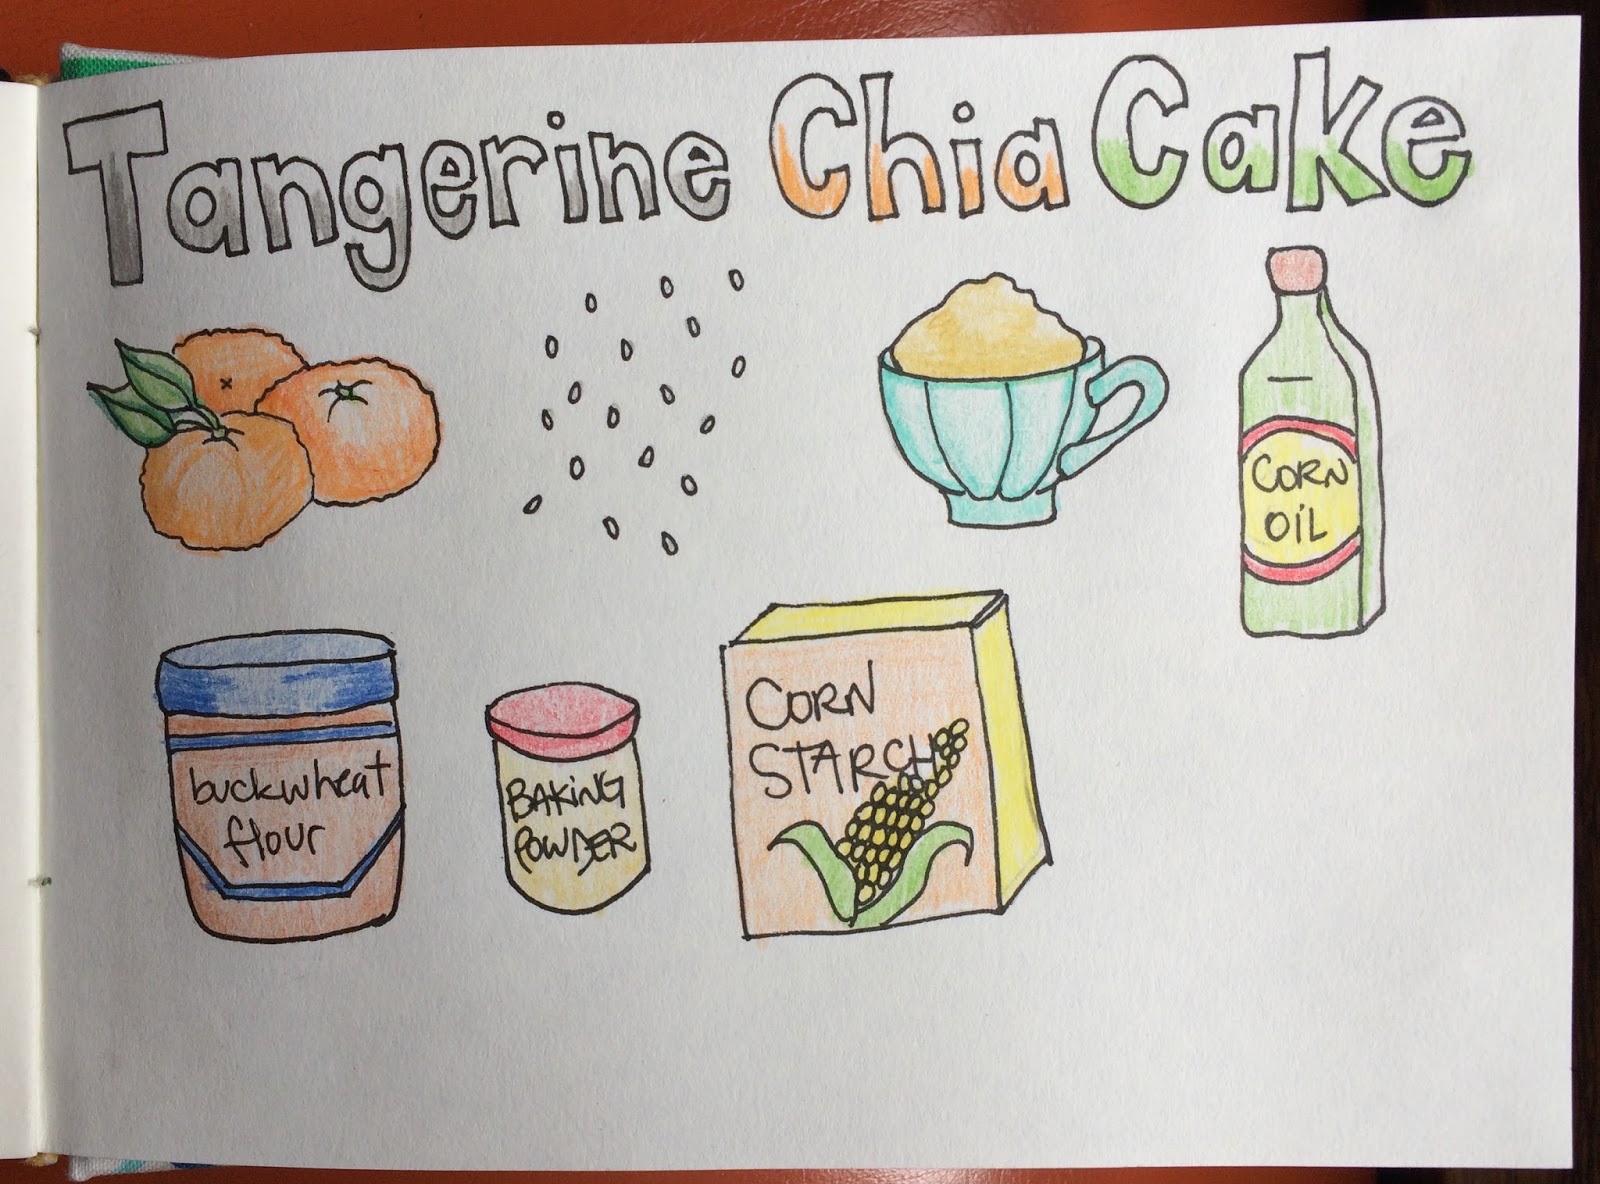
Budin de mandarina. Tangerine Pound Cake.


El invierno trajo las mandarinas y me da ganas de hacer todo con ellas!!! Aca les traigo la receta de un budin muy facil y rapido de hacer sanito y delicioso. Yo pongo aca la version vegana pero siquieren hacerla con huevo en vez de chia funciona igual. Se necesita batidora o minipimer. Recomiendo elegir mandarina de cascara bien finita. Es una gran excusa para invitar a los amigas a tomar el te y combatir la bajon de los dias frios!

Ingredientes
- 2 1/2 ó 3 mandarinas
- 2 cdas de semillas de chia
- 130 gr de almidon de maiz
- 120 gr de harina de sarraceno
- 1 cdta de polvo para hornear sin gluten
- 200 gr de azucar mascabo
- 100 cl de aceite de maiz

Instrucciones
Lavar bien las mandarinas, en lo posible usar organicas pero si no consiguen, dejar las mandarinas en remojo con un chorro de vinagre de alcohol y luego enjuagar. Si tienen un cepillito tambien pueden darle una cepillada. Exprimir media mandarina y mezclar las 2 cdas de chia con 6 ó 7 cdas de jugo. Dejar actuar, se va a formar como un gel. En un bowl mezclar con batidor de varillas el almidon de maiz, el polvo de hornear y la harina de trigo sarraceno para que quede bien homogeneo. Precalentar el horno a 180ºC. Abrir por la mitad 2 mandarinas sin pelar y quitar las semillas. Poner en el vaso de la licuadora (o en un bol amplio si lo hacen con minipimer) las 2 mandarinas, el aceite, el huevo de chia y el azucar. Pulsar hasta lograr una mezcla homogenea, si es necesario entre licuada y licuada bajar con una espatula lo que va quedando en los bordes. Agregar de a poco la mezcla de harina, haciendo el mismo trabajito de ir bajando los costados para que se mezcle bien todo. Aceitar y enharinar un molde de budin. Una vez que esta todo bien bien homogeneo volcamos en el molde y horneamos  alrededor de 35 minutos o cuando este doradito y al pinchar con un palito de brochet salga con migas y no masa. Recomiendo comerlo en el momento o trozarlo y freezarlo. La pasteleria vegana y sin gluten tiende a cambiar bastante rapido su textura por lo que es recomendable freezar lo que no se consume el primer dia y descongelarlo cuando se quiera. Si gustan con el jugo de la media mandarina restante y azucar impalpable apta pueden hacer un glaseado. Que lo disfruten!!


Winter brought the tangerines and I feel like eating them in any way possible!!!I bring here a Pound Cake recipe, super easy and fast to do, healthy and delicious on top. The version here is vegan but if you are not vegan and you can usa an egg instead of the chia mix. I recommend using the thin skinned tangerines and organic ones if you find them. It is great excuse to invite your friends over for tea and fight the winter blues!

Ingredients
- 2 1/2 or 3 tangerines
- 2 Tbsp chia seeds
- 130 gr corn starch
- 120 gr buckwheat flour
- 1 tsp gluten free baking powder
- 200 gr mascabo sugar
- 100 cl corn oil

Instructions
Wash thoroughly the tangerines with the skin, if they are not organic immerse them in water with a dash of white vinegar let them rest there for a few minutes and rinse. Squeeze half tangerine and mix 6/7 Tbsp with the 2 Tbsp of chia seeds. Mix well and let rest to form the gel. In a bowl mix the corn starch, the baking powder and the buckwheat powder with a whisker. Preheat the oven to 180ºC. Cut the remaining tangerines in halves and take the seeds away. Put them in the glass of the blender or in a bowl if you use a hand-mixer. Add the oil, the chia mix and the sugar. Blend until smooth, if necessary use a spatula to bring down the dough climbing the sides. Slowly add the flour mix repeating the spatula process if needed. Oil and flour a pound cake tin. When the mix is totally even, put the dough in the tin and bake for around 36 minutes, or until golden and pinching with a brochette stick, it comes out clear I recommen either have it immediatly -yumm- or freeze it even a bit warm. Vegan gluten free bakery can change a lot the texture in the first 24 hours so even if you plan to eat the cake just a couple of days later it is better to freeze it in the meantime. I hope you enjoy it!!!


lunes, 11 de abril de 2016

Bocados de berenjena con hojas de batata. Eggplant bites with sweet potatoe greens


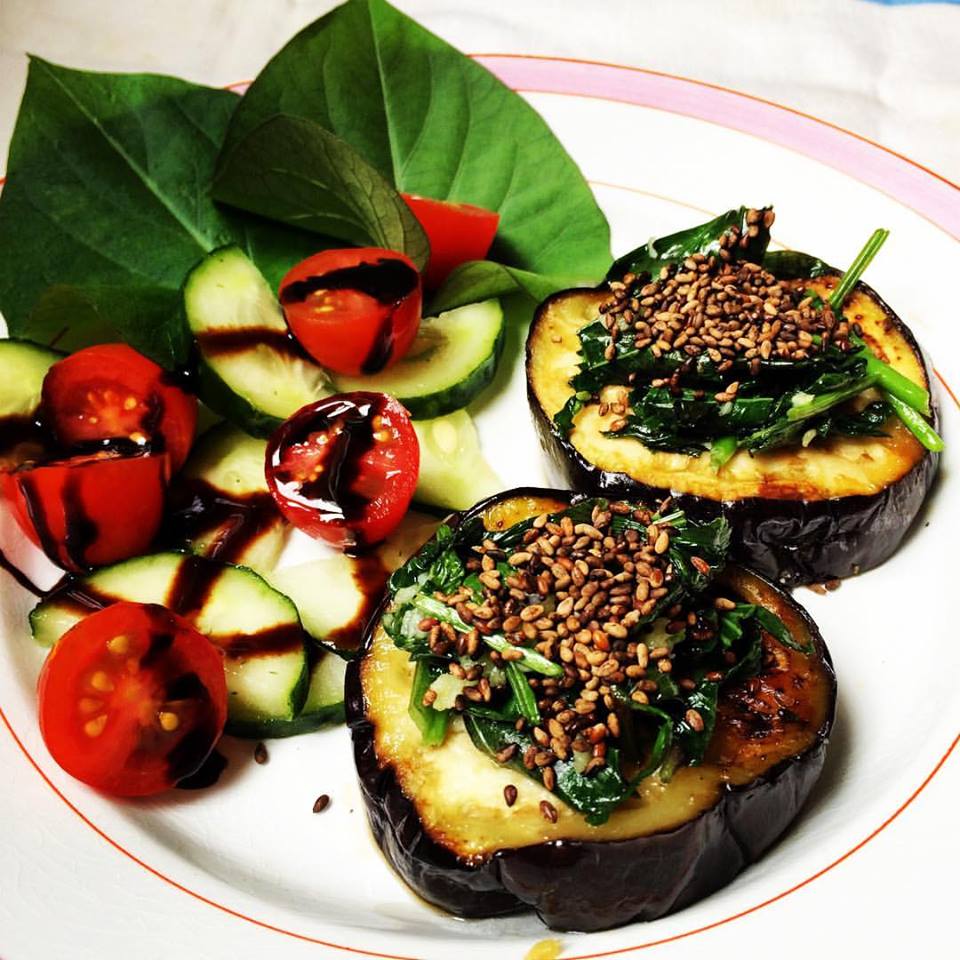
Hace un tiempo un amigo me conto que en Vietnam comen las hojas de la batata. En esa época yo habia empezado a plantar todas las batatas que se brotaban pero todavia no me animaba a comerlas...porque? Ni idea. Las plantas de batatas son muy faciles de criar y muy decorativas. Crecen de gajo muy facilmente y no tienen exigencias. Asi que ahora teniendo una plantas hermosas me tenté y son riquisimas!!! Asi que esta receta es solo una excusa para mostrarles que facil y que rico es comer hojas de batata. La idea de los bocaditos de berenjena me la inspiro un plato que comi en lo de un cocinero japones una vez y tambien se puede versionar con el topping que gusten. En el plato puse un par de hojas enteras para que vean que lindas que son. A ver si se animan!

Ingredientes

-1 berenjena 
-1 atado/ramo de hojas de batata
-1 diente de ajo
- sesamo
- aceite de girasol

para acompañar
- 1 puñado de tomates cherry
- 1 pepino chico
- aceto balsamico cremoso
- aceite de oliva


Instrucciones
Empezamos tostando apenitas un puñado de sesamo en la sarten caliente, sin ninguna materia grasa. Apenas un par de segundos para que no se queme, retirar de la sarten y reservar en un bowl aparte. Lavar y cortar en tiras anchas las hojas de batata y los cabitos. Picar el ajo. Cortar la berenjenas en rodajas gruesas, como de 1,5cm / 2cm. Calentar un poco de aceite en la misma sarten y dorar las hojas y el ajo por un par de minutos y reservar tambien aparte. Agregar un poco de aceite si es necesario, y cocinar las berenjenas. Dejar que se doren un poco de cada lado. Yo tapo la sarten un poco de minutos. Una vez que esten tiernas pero que no se desarmen. Servir 2 ó 3 rodajas de berenjena en cada plato. Arriba de cada rodaja poner un poco de hojas de batata con ajo y arriba el sesamo tostado. Para acompañar cortar los cherrys en mitades, el pepino en rodajas y condimentar con el aceto y oliva. Voila! Se van a sorprender!!!


Some time ago a friend of mine told me they eat the sweet potato greens in Vietnam. I was starting to grow sweet potato plants from every sweetpotato that would sprout but still had not dare to try them as food. Sweet potato are a very easygoing plant to grow and very decorative. They do not like cold but otherwise can adapt to grow indoors and have no big demands. I have some wonderful plants these days and finally got tempted. And you know what? They are delicious!  So this recipe is actually an excuse to show how easy is to eat sweet potato greens. The eggplant base was inspired by dish a Japanese chef cooked a while ago. You can top it with any other thing you like also. I left a couple of whole leafs on the dish so you could see how nice they look.
I hope you dare to try!


Ingredients

-1 eggplant
-1 bunch of sweet potato greens
-1 garlic clove
- sesame
- sunflower seed oil

as a side
- 1 handful of cherry tomato
- 1 small cucumber
- creamy balsamic
- olive oil


Instructions
We start by roasting the sesame seeds in a clean pan. Just a few second not to burn them and without any fat. Set aside the seeds and the pan, we will use it later. Wash and cut the sweet potato greens and chop the garlic. Cut the eggplant in 1,5cm/ 2cm slices. Heat some oil in the same pan you used, and cook the greens and garlic until slightly soft it only takes some minutes. Set them aside and lay the eggplants slices and let them cook until golden in both sides, tender  but not too soft. Put 2 ó 3 eggplant slices in each dish. Top it with the sweet potato greens and garlic, and finish with the roasted sesame seeds. Cut the cherry tomatoes, cucumber and dress with olive oil and creamy balsamic. Voila! You will be surprised!!


viernes, 26 de febrero de 2016

Teff pizza. Pizza de Teff.


Esta es mi primer receta con Teff y quiero decirles que estoy muy satisfecha!! El Teff, es una semilla muy chiquita similar a un cereal sin gluten originario de Etiopia. Es muy rico en proteina, fibras y minerales como el hierro. Yo habia probado algunos productos industriales con Teff como galletas y pan pero nunca puro y nunca habia preparado nada sola. Como hace un tiempo tenia antojo de pizza decidí experimentar asi. Yo hice una version vegana pero tambien funciona perfecto con la clasica salsa de tomate y queso derretido.
Hagan la version que mas les guste, la fantasia puede volar con la pizza!!!

Ingredientes
- 250 gr de harina de teff
- 1/2 cdta de goma xantana
- 1 cdta de levadura seca sin gluten
- 1/2 cdta de azucar
- 1/2 cdta de  sal
- 250ml de agua tibia
- 4 cdtas de aceite
- 4 cdas de salsa de tomate casera
- toppings a gusto, queso muzzarella, hierbas frescas y aceitunas, tomate fresco y ajo, como la que hice yo: hummus, morrones asados y rucula fresca.

Instrucciones
Poner en un bol todos los ingredientes secos: harina de teff, goma xantana, azucar, sal y levadura. Mezclar bien, bien, Agregar el agua tibia, luego el aceite y mezclar animadamente con cuchara de madera hasta que se forma una masa firme. Esparcir la masa en una pizzera aceitada y dejar levar por 60'/90' . Precalentar el horno a 180ºC cubrir con los toppings y hornear por 10'/15'. Yo hice una pizza mediana y una pequeña. Para poder freezarla a la grande solo le puse salsa de tomate y la deje en el horno solo 8'/10'. Luego la saque y la deje descongelar y la cubri con hummus y tiras de morron asado. Siempre que elijamos hojas frescas, como albahaca, rucula o similar, recomendaria ponerlas  al servir luego sacar la pizza del horno. Buon appetito!!!

This is my first recipe with Teff and I have to say I am super satisfied with the result. If you are not familiar with the Teff let me tell you it is a very small seed similar to cereal originally from Eritrea. It has a lot of protein, iron and fiber. I had tasted already some industrialized products with it, but never pure and had never baked with it before. As I was craving for pizza I decided it was a good opportunity to give it a try. I prepared it in a vegan version with homemade hummus, roasted pepper and fresh rocket, but works wonders also with grated cheese. Try your own version, pizza fantasy has no limits!!

Ingredients
- 250 gr teff flour
- 1/2 tsp xantan gum
- 1 tsp dry gluten free yeast
- 1/2 tsp sugar
- 1/2 tsp salt
- 250ml warm water
- 4 tsp oil
- 4 Tbsp homemade tomato sauce
- toppings to taste, my version here is with homemade hummus, roasted pepper and fresh rocket, but you can try with cheese, and olives if you are not vegan, fresh tomatoes and garlic, fresh herbs or whatever comes to your mind

Instructions
Put in a bowl all the dry ingredients, flour, xantan gum, sugar, salt and yeast. Mix thoroughly. Add the warm water, then the oil and mix all with a wooden spoon until it becomes a thick dough. Spread on a oiled baking tray and let rise for around 60'/90'. Preheat the oven to 180ºC. It yields a big pizza but I made a medium one and a small one. I ate the small one right away and decided to freeze the medium one. So I put soem tomateo sauce and baked the one for the freezer just 8'/10'. Let it cool and froze it If you eat it right away bake for arouns10'/15'. For the hummus, pepper, rocket version I would recommend to top it with everything but the fresh leaves before baking. Then add the rocket when serving as with any nice fresh leave to avoid them to shrink. Buon appetito!!

martes, 2 de febrero de 2016

Borscht!!!!

Perdoooooooon, se que estuve ausente por muchisimo tiempo. Estuve trabajando mucho y despues aterrizando... Pero para compensarlos les traiga una receta espectacular. Supongo que habran oida hablar del Borscht. Es una sopa tipica de Europa del Este que tiene version de invierno y version de verano. En dias de frio Berlin es mi plato favorito en un pequeño restaurant ruso en Wedding y viendo las hermosas remolachas que tenian estas ultimas semanas en Buenos Aires me inspiré para hacer una version un poco libre para servir en una cena con amigos. Estaba un poco nerviosa porque entre mis invitados contaba con un chef profesional y 2 vocacionales muy talentosos. Pero finalmente fue un exito. Da un poco mas de trabajo que mis recetas habituales pero se puede preparar con anticipacion y armar el plata en el momento.

Ingredientes (para 6 porciones)
- 4-6 remolachas dependiendo del tamaño
- 2 tazas de jugo de coccion de las remolachas
- 1 1/2 tz de caldo *
- jugo de medio limon
- 2 cdas de vinagre de arroz
- 1 cdta de miel o azucar morena
- 150cc de yogur natural sin endulzar
- sal
- pimienta
- 1 pepino pequeño o 1/2 gde
- 5 rabanitos
- 6 cdas de queso blanco 
- wasabi a gusto

 *usar caldo sin gluten o hervir unos trocitos de verdura como una zanahoria una rama de apio y una cebolla con un poco de sal y especias si gustan, por un rato y voila, caldo de verduras casero!

Instrucciones
Lavar las remolachas a conciencia, yo las cepillo en general para sacar bien toda la tierra. Poner en una olla cubrir apenas con agua y hervir hasta que esten tiernas. Dejar enfriar. Retirar las remolachas. Colar el jugo de coccion y separar 2 tazas en un bowl amplio. Agregar el caldo frio, el jugo de limon, el vinagre, la miel, la sal y pimienta y mezclar bien. Pelar y cortar las remolachas en trozos asi nomas y agregar al bol. Procesar con minipimer y sumar el yogur. Procesar todo hasta que quede homogeneo. Refrigerar al menos un par de horas antes de servir. A la hora de servir, cortar los pepinos y los rabanitos en cubitos pequeños, de medio centimetro de lado. Mezclar el queso blanco con la cantidad de wasabi que gusten. Servir bien frio, poniendo 2 cucharadas de cubitos de pepino y rabanito y una de queso crema en cada porcion. Un plato muy refrescante y sano para lucirse las noches de verano, mis invitados estaban muy felices !!!
I am so sorry I've been away for so long. I had loads of work and then changin continents. But to make it up for you I bring a wonderful recipe. I guess you heard about Borscht already. It is a fantastic east european traditional recipe with a lot of different versions. In the cold days in Berlin it is my favourite dish at a small russian restaurant in Wedding. In the last days the red beets were so nice here in Buenos Aires I got inspired. I was a bit nervous because I prepared it for the first time for a dinner with friends, and i had as guests 1 professional chef and 2 amateur ones but really good ones. But finally it was a huge success. It needs a bit more work than my ususal recipes but it is totally worth it and it can be prepared in advance, even the day before and set together afterwards.

Ingredients (shields 6 )
- 4-6 red beets
- 2 cups from the red beets cooking liquid
- 1 1/2 cups vegetable broth*
- juice of 1/2 lemon
- 2 Tbsp rice vinegar
- 1 tsp honey or brown sugar
- 150cc natural unsweetened yogurt
- salt
- pepper
- 1 small cucumber or half a big one
- 5 radishes
- 6 Tbsp cream cheese
- wasabi to taste
 * the broth should be gluten free, if you want to make a home made one just boils some carrot, celery and onion with a dash of salt and some sipces if you like. Voila! Homemade broth!

Instructiones
Wash the beets thouroghly, I brush them to take all the earth out. Boil them covered in water until they are tender. Let cool. Set the beets aside and strain the liquid where the beets where boiled. Measure 2 cups into a bowl. Add the broth, lemon, juice, vinegar, honey or sugar, salt and pepper and stir. Peel and ccut in big pieces de beets, add in the bowl and mix with a hand mixer, add the yogurt and mix again until the soup has a smooth texture. Put in the fridge for at least 2 hours before eating it. To serve it, cut the radishes and cucmber in small cubes of half a centimeter side. Mix the cream cheese with wasabi to taste. Serve a portion of the soup, add 2 tablespoons pf the radish-cucumber cubes and add one tablespoon of the wasabi cream cheese. It is a super refreshing summer dish and my guests were very impressed. I hope you love it too!!