Nunca antes habia probado ñoquis de batata pero por alguna razon sabía que me iban a encantar..... y tenia razon! Es una receta muy facil y tiene un saber muy delicado. Si no quieren tomarse el trabajo de marcar cada ñoqui se pueden cortar en trocitos chicos y se cocinan super rapido. Yo las prepare con unas cebollitas glaseadas y mix de semillas tostadas, en una version totalmente vegana. Tiene un suave sabor dulzon que queda genial con las cebollas pero se dejan acompañar con cualquier salsa que les gusten. Cuentenme como los prepararon.
Ñoquis
Ingredientes
- 400gr de batata cocida (yo las hice al vapor)
- 1/2 taza harina de arroz mas extra para trabajar
- 1/2 taza almidon de maiz
- 2 cdas de semillas de lino molidas
- 6 cdas de agua
- 1 cdta de semillas de eneldo tostadas y machacadas
- 1 pizca de sal
Instrucciones
Hacer un pure con las batatas. Poner el lino molido a hidratar en las 6 cdas de agua y dejar reposar 5 minutos. Agregar harina y almidon tamizadas al pure de batata. Mezclar bien y agregar las semillas con todo el liquido. Agregar la sal y las semillas de eneldo. Unir todo bien y deberia quedar una masa masomenos firme pero no dura. Enharinar la mesada y amasar con las manos armando rollitos de masomenos 1,5cm de diametro. Cortar trocitos de 2 a 3 cm de largo y si gustan darle la formita clasica pasandolos por un tenedor presionando suavemente. Poner en un plato o bandeja sin apilar. Si
los van a freezar recomiendo poner la bandeja abierta en el freezer por
30 min hasta que los ñoquis esten duros y ahi guardarlos, de esta
manera no se pegan. Cocinar en agua hirviendo con aceite y sal. Recomiendo revolver un poco el agua para que no se peguen. Cuando flotan estan listos!!
Cebollas glaseadas y semillas
Ingradientes
- 3 cebollas
- 2 dientes de ajo
- 1 cdta de aceite de coco
- sal
- 1 cdta de almibar
- 1 cdta semillas de lino
- 1 cdta semillas de girasol
- 1 cdta semillas de sesamo
- 1 cdta semillas de eneldo
Instrucciones
Cortar las cebollas en tirar bien finas y picar el ajo, reservar. Calentar una sarten limpia y poner las semillas ahi. Moverlas para que se tuesten parejas un par de minutos. Retirar y reservar en un bol resistente al calor. Poner la cdta de aceite en la misma sarten caliente, se va a derretira instantaneamente, agragar la cebolla y el ajo. Revolver por medio o un minuto sin que se queme y salar. La sal hace que la cebolla suelte su jugo. Seguir cocinando por 5 minutos mas revolviendo un poco para que no se queme y agregar el almibar. Cocinar por un minuto mas. Servir las cebollas sobre los ñoquis y espolvorear con las semillas. Si tienen florcitas frescas de ciboulette tambien las recomiendo mucho. Bon apetit!!
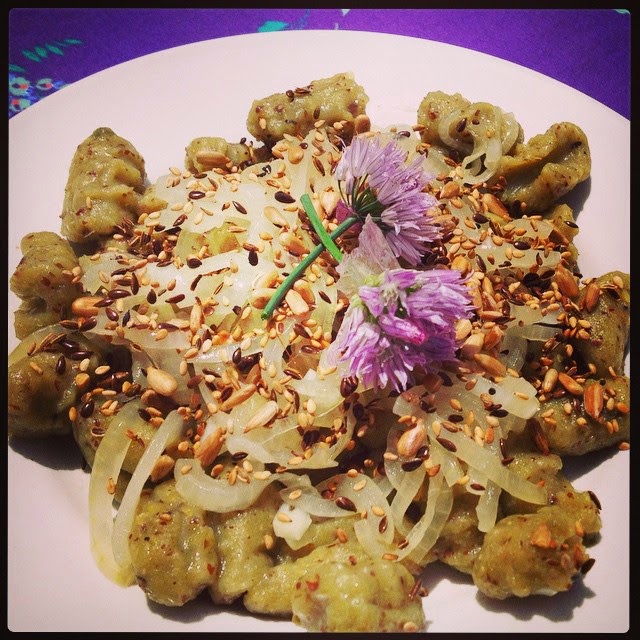
I´ve never tried sweet potatoe gnocchi before but somehow I was sure I would love them. And I was right!! It is super easy and has a very delicate taste. If you don´t want to take the time to mark each, you can also cut them in small pieces. I served them with glacé onions and toasted seeds in a full vegan version. This gnocchi have a soft sweet taste that matches perfectly with the onions but prepare them with the sauce of you choice. Let me know how you prepare them.
Gnocchi
Ingredients
- 400gr cooked sweet potatoes (I steamed them)
- 1/2 cup rice flour plus extra to work the dough
- 1/2 cup cornstarch
- 2 Tbsp milled flax seed
- 6 Tbsp water
- 1 tsp toasted dill seed crushed
- 1 pinch of salt
Instructions
Mash the sweet potatoes. Put the flaxseed with the 6 Tbsp water and let rest for 5 minutes. Add rice flour and cornstarch, salt to the mashed sweet potatoes and mix wel. Add the flaxseed with all the water mix well, and add the salt and the crushed seeds. Mix again, it should hold together but it souldn´t be hard. Flour the working surface and make some thin rolls, 1,5 cm thick, and cut them in 2 or 3cm long pieces. If you want (I have lots of fun with this step but it takes some time) roll every piece pressing softly over a fork to achieve the characteristic gnocchi shape. Lay them in a plate or tray without overlapping. To freeze them I suggest to put the tray open for some 30 minutes or until they are hard and then put them in a container or a bag. It prevents them from sticking.
To cook lay them in boiling water with salt and oil. Stiring a bit again to prevent sticking. When they come to the surface, they are ready!!
Glacé onions and toasted seeds
Ingradients
- 3 onions
- 2 garlic cloves
- 1 tsp coconut oil
- salt
- 1 tsp homemade syrup (optional)
- 1 tsp flax seed
- 1 tsp sunflower seeds
- 1 tsp sesame seeds
- 1 tsp dill
Instructions
Cut the onions in thin slices and set aside. Heat a clean pan and put the seeds ther eto toast for a minute moving it to have the evenly toasted. Lay the seeds in a heat proof bowl and set aside. Put the coconut oil in hte already heated pan and add the onions and garlic. Stir for about a minute and add the salt. Keeo stiring. The add makes the onions let their juice out. Keep cooking for 5 minutes, stiring very once in a while. Add the syrup, cook for a minute more and ready. Lay the onion on top of the gnocchi, sprinkle the seeds and if you have some around add a couple of ciboulette flowers to bring some extra beauty and spiciness. Bon apetit!
Esta receta podria ser una version del jrein, esa preparacion picante que en la comida tradicional judia se le agrega al guefillte fish, como el chimichurri al asado. Son 3 ingredientes y taan deliciosa!! Se puede usar como dip para comer con palitos de verduras, para untar pan o galletas, o incluso como salsa. Yo use yogur casero hecho en casa, si quieren hacer una version vegan pueden usar yogur de soja o suavizar con porotos blancos cocidos(yo probe esta version y si bien me gusta mas con yogur funciona muy bien tambien). El wasabi que utilice es el que se comercializa en negocios de productos asiaticos, pero investigando un poco lei que esta hecho con rabano picante del que se usa precisamente para hacer el jrein, asi que les dejo la eleccion a ustedes ya que debe funcionar igual.
Ingredientes
- 2 remolachas hervidas
- 1 wasabi o rabano picante cantidad a gusto
- 2 cdas de yogur natural
Instrucciones
Cortar las remolachas en cubos y poner en un bol junto al yogur y el wasabi. Procesar con la minipimer hasta obtener una crema pareja. Probar para chequear el picor y corregir si es necesario. A disfrutar esta explosion de color y sabor!!
This recipe could be a version of the hot preparation that is traditionally served with Gefilte fish in the traditional Jewish kitchen. It is just 3 ingredients and sooo tasty. Can be use as dip to eat with veggie sticks, as a spread or even as a sauce. I used homemade natural yoghurt, if you want to do it vegan, you ca use vegan yoghurt if it's available where you live or add some cooked white beans (I tried this last one, was very nice but I like it better with the yoghurt). I used the wasabi powder or paste you can find in an asian store but after some research I found out that it is mostly made out of horseradish so I guess it is the same.
Ingredients
- 2 cooked beets
- wasabi or horseradish to taste
- 2 Tbsp natural yoghurt
Instructions
Cut the beets and put in a bowl. Add the wasabi and yoghurt. Blend with a hand mixer until it is creamy. Taste to check hotness. Enjoy this flavour and color explosion!!!
Y se me acabo la granola que hice en septiembre, si queres verla aqui
Asi que aqui va un nuevo modelo, en este caso use trigo sarraceno o alforfón. Se asustaron? No, a pesar de llamarse trigo, no tiene gluten y ni siquiera es un cereal. Es super nutritivo, muy bonito de ver y tiene un leve saber tostado que a alguna gente no le gusta pero a mi me encanta. Yo use la version que ya viene tostada Esta receta necesita mas tiempo que otras pero como es una gran cantidad y dura un buen rato vale la pena.
Ingredientes
- 3 tazas de trigo sarraceno
- jugo de medio limon
- agua cantidad necesaria
- 4 cdas de sesamo
- 6 cdas de semillas de girasol
- 5 cdas de lino molido
- 5 cdas de chia molida
- 1/2 tz de amaranto inflado
- 1/2 taza de pasas de uva
- 1/2 taza de nueces
- 2 cdas de miel, o jarabe de arce para la version vegana
- 1 cda de aceite de coco
- 1 pizca de sal
Instrucciones
Poner el trigo sarraceno en un bol, cubrir con agua que exceda al menos 3 cm en altura al sarraceno. Agregar el jugo de limon y dejar reposar por 8 horas. Pasado ese tiempo prencalentar el horno a 100ºC. Colar y enjuagar 3 ó 4 veces y volver a colar. Si la miel y el aceite estan solidos derretir a baño maria y mezclar bien. Agregar al bowl de sarraceno colado, todas las semillas, las nueces y las pasas. Mezclar ennergicamente para que se reparta bien todo. Agregar la mezcla de miel y aceite y mezclar mucho mas, para que tambien la miel y el aceite se repartan homogeneamente. Repartir en 2 placas y poner en el horno a 100ºC por 1 1/2 hora masomenos o hasta que el sarraceno este sequito. Sacar cada media hora revolviendo e intercambiando la posicion de las placas. La que estaba arriba va abajo y viceversa cada media hora. Dejar enfriar y guardar en recipiente hermetico. Disfrutar en el desayuno o cuando mas les guste!
So...my september granola is over, if you want to check it here is the link
So I decided to try something new, in this case I used buckwheat as a base. Don't be scared despite having the word wheat in the name buckwheat is not even a cereal. It is super nutritious, looks very nice and a bit of a characteristic taste that some people might not like but I love. I usa the toasted version because I bought mine in Poland but I'm sure it works with the raw one. This recipe need a bit of time, but it is a big amount and lasta long so it's worth the effort.
Ingredients
- 3 cups buckwheat
- juice of half lemon
- water
- 4 Tbsp sesame
- 6 Tbsp sunflower seeds
- 5 Tbsp milled flax seed
- 5 Tbsp milled chia seeds
- 1/2 cup popped amaranth
- 1/2 cup raisins
- 1/2 cup walnuts
- 2 Tbsp honey, or maple syrup for the vegan version
- 1 Tbsp coconut oil
- 1 pinch salt
Instructions
Put the buckwheat in a bowl, cover with water with an extra 3 cm at least, the buckwheat is going to "drink" the water. Add the lemon juice and let rest for 8 hs. After this time, preheat the oven to 100ºC. Strain the buckwheat and rinse 3 times or more, strain again and put in a big bowl. If the honey and oil are solid, melt them with a quick double boiler to be able to mix them well. Add to the buckwheat all the seeds, raisins, walnuts and mix well. Then add the oil-honey mix and mix super well. Spread in 2 baking trays and put in the oven to 100ºC for about 1 and a half hour. Take them out every half hour stir a bit and switch position of the tray in the oven. The one which was in the upper part then goes lower and the other way around. When the buckwheat is dry. Let cool and store in an airtight container. Enjoy it for breakfast or anytime!!
Soy una fan declarada de las hojas de remolacha, me encanta su color, su sabor y ademas son super sanas. Tienen hierro, y mucho acido folico y flavonoides. Hace rato que tenia ganas de postear una receta sencilla para hacer una tarta sin tener que amasar. Si les parece muy experimental pueden reemplazar las hojas de remolacha por espinaca o acelga. Aqui va, que la disfruten!
Ingredientes
- hojas de un atado remolacha.
- 3/4 taza de polenta instantanea cruda, preparada con 3 partes de agua
- 2 huevos
- 3 cdas de queso blanco
- sal y pimienta
- queso para gratinar
Instrucciones
Preparar la polenta segun las instrucciones del paquete. Poner un poquito de aceite en una tartera y esparcir la polenta cubriendo la base y los costados. Precalentar el horno a 180º. Lavar las hojas de remolacha y separar lo tallos de las hojas y cortarlos en trozos no muy pequeños. Poner en una olla con un poco de agua. No es necesario cubrir todas las hojas ya que se achican muchisimo y con la humedad propia alcanza. Cocinar hasta que los tallos esten tiernos pero no blandos. Poner unos minutitos la base de polenta en el horno mientras se cocinan las hojas. Colar bien las hojas, aplastando las hojas con una cuchara hasta sacarle todo el liquido posible. Poner en un bol junto s los huevos y el queso blanco, mezclar bien y condimentar con sal y pimienta o lo que gusten. Volcarlo sobre la base de polenta y rallar queso por arriba. Hornear por 25 minutos o hasta que el borde este dorado y el queso bien derretido. Yo la acompañe con una rica calabaza al horno. Podes aprovechar que prendes el horno y hacerlas al mismo tiempo que la tarta. Cortas una calabaza en rodajas y la pones en una asadera con un chorrito de aceite y la espolvoreas con un poco de sal marina. Apenas prendes el horno las tiras adentro y listo! Buen provecho!!
I am a huge beet greens fan, I love their taste, their color and they are superhealthy. They have a lot of iron, folic acid and flavonoids. I wanted to post an easy recipe for a pie without kneading. If you find the beet greens too experimental feel free to change them for spinach or chard. Here it is, enjoy!
Ingredients
- a bunch of beet greens.
- 3/4 cup instant prepared with 3 times water
- 2 eggs
- 3 Tbsp cream cheese
- salt and pepper
- cheese to grate
Instructiones
Prepare the polenta according package instructions.Oil slightly a baking tin and spread the polenta evenly covering the base and the borders. Preheat the oven to 180º. Wash the greens and cut them roughly in pieces. Put in a pan with a bit of water and cook until tender but not soft. It is not necessary to cover them with water, they shrink fast. Put the polenta base for some minutes in the oven to let it dry a bit while the greens are boiling. When they are ready, strain them thoroughly and press to take any extra of water. Put in a bowl with the cream cheese and the 2 eggs, mix well and season with salt and pepper to taste. Pour the mix over the polenta base and grate some cheese on top of it.
Bake for
25 minutes or until the polenta is golden and the cheese is nicely melted. I ate it with roasted butternut. You can roast them while you prepare the pie. Wash and cut them in rings, place in an slightly oiled baking tray with a bit of sea salt on top. As soon as you turn on the oven you can place them. Bon apetit!!
Estos panqueques son un clasico de la comida vegana, no me voy a atribuir la autoria porque es imposible saber quien la hizo primero. Pero como todo buen clasico vale la pena probarlo, aqui yo les puse una semillas tostadas para darle un toque aromatico y al relleno le agregue un toque de vino.
Ingredientes
para los panqueques:
- 1/2 taza de harina de garbanzo
- 1/2 taza de agua
- 1/2 cdta de semillas de coriandro
- 1/2 cdta de semillas de comino
- 1 pizca de sal
para los vegetales:
- 1 morron
- 1 zanahoria
- 1 cebolla
- 1 diente de ajo
- aceite de oliva
- un chorrito de vino blanco
Instrucciones
Poner la harina de garbanzo y el agua en un bol, mezclar con un batidor de varillas hasta que este homogeneo y agragar una pizca de sal. Dejar reposar. Calentar una sarten sin aceite y tostar las semillas por una par de minutos. Dejar enfriar. Moler un poco las semillas y agregar a la mezcla de garbanzo y agua. Cortar las verduras en tiritas finas y saltear en aceite de oliva por 10 minutos o hasta que empiecen a estar tiernas, agregar el vino y cocinar un par de minutos mas. Calentar otra sarten con un poquitito de aceite o spray vegetal. Mezclarla mezcla para homogeneizar la mezcla de harina de garbanzo. Y poner un cucharon de la mezcla en la sarten bien caliente, mover hasta que quede una capa pareja. Cocinar hasta que los bordes esten doradas y dar vuelta cuidadosamente y dejarlo dorarse por unos minutos. Repetir con el resto de la mezcla. Poner la mitad de las verduras en sobre cada uno de los crêpes, doblar y servir. Yo lo servi acompañado de verdolaga o portulaca comestible, es una suculenta que aparece en nuestras macetas en primavera y es super nutritiva. Buen provecho!

These crêpes are a vegan classic, i am not taking credits for it because it is a imposoble to know who invented itBut as a Classic it is worth a try. My version has some toasted seeds for some aromatic effect and a hint of wine in the veggies.
Ingredients
for the crêpes:
- 1/2 cup chickpea flour (garbanzo flour, Gram flour)
- 1/2 cup water
- 1/2 tsp coriander seeds
- 1/2 tsp cumin seeds
- 1 pinch of salt
for the veggies:
- 1 bell pepper
- 1 carrot
- 1 onion
- 1 garlic clove
- olive oil
- a shot of white wine.
Instructions
Put the chickpea flour and the water in a bowl, mix thoroughly and add the salt. Let rest. Heat a pan without any oil and toast shortly the coriander and cumin seeds. Let cool. Crush the seeds and add to the batter Dejar
reposar. Cut the carrot, onion, pepper and garlic in thin stripes. Stir fry them in olive oil for 10 minutes or until they start to be tender and add a shot of white wine. Let simmer a couple more minutes and set aside.
Heat another pan with a bit of oil or vegetable spray. Stir the batter and pour half of it on the heated pan. Move it until the there is a thin and even layer and when the edges turn golden, flip the crêpe carefully and let it turn gold on the other side. Repeat with the remaining batter. Lay half of the vegetables on each of the crêpes and fold them nicely. I chose purslane to add some colour, it is an edible succulent which grows wildly in spring. It has some nicely acid flavor and it is super nutritious. Bon apetit!!
Siempre quise probar hacer un pan tipo Pita sin gluten. Lo genial de este pan es que se hace sin horno, yo lo hice en plancha de hierro pero es posible hacerlo en sarten. Toma en total 30 minutos aproximadamente y Voilà!
Ingredientes
-1 taza de premezcla sin gluten con goma xantica (yo puse 1 cdta de polvo de hornear sin gluten, 1 cdta de goma xantica,1/3 de maicena y complete la taza con mitad de harina de arroz y mitad de harina de mandioca )
- 2 cdas de semillas de lino molidas
- 1/2 cdta de sal
- 1/2 cda de aceite neutro
- 1/2 taza de agua aproximadamente.
- extra harina
Instrucciones
Mezclar la harina, la sal, el polvo de hornear, y el lino y mezclar bien todo lo seco. Agregar el aceite y luego de muy poco el agua hasta que lograr una masa que no se pegotee y sea elastica. Prender la placnah para que se caliente, si lo hacen en sarten pueden esperar un poco para este paso. Separar la masa en 4 partes y enharinen una superficie para amasar con palote. Si van a hacerlos para rellenar dejarlos de 5/6mm de espesor y si es para untar y que quede mas crocantes 3mm.Poner sobre la plancha o la sarten sin usar materia grasa y dejar no mas de 10 minutos del primer lado y 8 minutos del segundo. Para rellenar quizas un poco menos, ir tocando un poquito y ver que este sequito pero flexible. Disfrutar como sandwich o con un rico hummus!!
Tip, si no los comes en el dia, conviene freezarlos.
I always wanted to make a gluten free Pita style bread. The fantastic thing about this bread is that you don't need an oven to do it. I used an iron pan, it work with a normal one as well. It takes only about 30 minutes and voilà!
Ingredients
-1 cup gluten free flour mix(I did 1 tsp xanthan gum, 1 tsp GF baking powder, 1/3 cup cornstarch, and half of the remaining cup manioc starch and half rice flour )
- 2 Tbsp milled flax seed
- 1/2 tsp salt
- 1/2 Tbsp neutral oil
- 1/2 cup water.
- extra flour
Instructions
Mix well all the dry ingredients, flour, salt, flax seed. Add the oil and slowly add bits of water until the dough turns elastic and non sticking. Start heating the iron pan(if using a normal pan start heating it later)
Flour a surface. Split the dough in 4 pieces and roll them with a rolling pin, 5/6 mm thick if you want to open for a sandwich or half for crispier just to spread. You can also cut them after rolling the dough in as many pieces as you like. Put them on the heated pan without any fat, 10 minutes on one side, turn and let it for 8 minutes more. Check the texture by touching softly the top part. Enjoy them with hummus or as a sandwich!!
Tip if you don't eat them the same day, it is better to put the remaining ones in the freezer.
Hace unos dias que busco una excusa para estrenar unos moldes muy bonitos que me regalo una amiga. Tenia unas bananas muuuy maduras (casi negras) y la idea de hacer algo con semillas de amapola. El resultado del experimento fue muy rico en el primer intento! Aqui la receta,
Ingredientes
- 2 bananas muuy maduras
- 1 pocillo de aceite neutro
- 2 cdas de semillas de lino molido
- 2 cdas de agua
- 2 cdas de cascara de naranja seca molida o una tirita fresca cortado bien chiquita
- 3/4 taza de azucar
- 3/4 taza de harina de arroz
- 3/4 taza de almidon de maiz
- 2 cdtas de polvo leudante (sin gluten)
- 1 cdta de bicarbonato de sodio
- 2 cdas de semillas de amapola
Instrucciones
Pisar bien las bananas. Agregar el aceite, el azucar y la cascara de naranja y mezclar hasta que quede como una crema. Mezclar el lino molido con las 2 cdas de agua y dejar reposar. Precalentar el horno a 180 y engrasar(manteca, aceite de coco o aceite neutro) los moldes. Agregar el lino hidratado a la mezcla de banana. En otro bol poner el almidon de maiz. harina de arroz, polvo leudante, bicarbonato de sodio y semillas de amapola y mezclar bien hasta ver que las semillas de amapola estan repartidas por toda la mezcla. Unir las partes secas y humedas y mezclar bien. Llenar 3/4 de los moldes y hornear 15 minutos hasta que esten suavemente dorados y al pinchar con un palillo salga limpio. Mmmmm delicioso!! ACTUALIZACION: Si no los comen en el dia lo mejor es freezarlos y descongelar para comer, ya que por la humedad que tienen, cambian un poquito la textura a medida que pasa el tiempo.

I have been looking for an excuse to use for the first time a very pretty I got as a present. I had 2 super ripe bananas and had the idea of baking something with poppy seeds. The result of the experiment was very good at the first try! So here is the recipe.
Ingredients
- 2 very very ripe bananas
- 1 espresso cup neutral oil
- 2 Tbsp flax seed, milled
- 2 Tbsp water
- 2 Tbs orange zest, milled if dry, or chopped if fresh.
- 3/4 cup sugar
- 3/4 cup rice flour
- 3/4 cup cornstarch
- 2 tsp baking powder
- 1 tsp baking soda
- 2 Tbsp poppy seeds
Instructions
Mash the bananas. Add oil, sugar and orange zest and cream together. Mix the milled flaxseed with the water and let rest. Preheat the oven into 180º and grease the baking cups. Add the flax seed water to the banana bowl and mix well. In another bowl put the rice flour, corn starch, baking powder, baking soda, and poppy seed, Stir them until the poppy seeds are evenly distributed. Combine wet and dry and whisk together until it is even. Fill 3/4 of the cups and bake for 15 minutes or until golden and a toothpick comes out clean. UPDATE, If you don't eat them in the same day, it's best put them in the freezer and take them out to eat. Mmmm delicious!!


